The first step to contributing code to Habitica's habitica.com website is setting up a local instance of the website to test your changes. This page contains instructions for how to do that in Docker.
If you are not using Docker, or if you want to contribute to development for the mobile apps, refer to the links in Setting up Habitica Locally.
Read each section on this page in order, ensuring that every instruction is followed before moving on to the next. If you experience errors, always stop and solve them before moving on to the next step.
It is important to also read Guidance for Blacksmiths for background information about coding for Habitica.
Prepare for Troubleshooting[]
A local install does not always go smoothly but we will be happy to help you! Habitica uses a lot of software and we understand that it can be complicated to install it all until you are used to it. Please follow all the steps in this section before you experience errors so that, if necessary, you can ask for help easily and we can assess your problem rapidly.
As you are installing Habitica:
- Record every command that you type and the full output of every command - save all the commands and outputs into a text file, or files, in case we need to see them later.
- Carefully read all output messages to look for errors.
- If you see an error, do not proceed further until the error has been resolved because later steps are likely to not work correctly.
- Screenshots can be an easy way to record errors but aren't as good for analyzing them, so if at all possible please provide the full error messages as text. This lets admins paste relevant parts into GitHub issues or into Google searches.
- If you need to deviate from any instructions anywhere on this page, record what you have done that is different and why. If you later need assistance, it is vital that the people helping you know about those differences, otherwise time can be spent on advice that isn't relevant to you.
If you need help with fixing any errors, upload all of the information you have gathered onto a site such as GitHub Gist, then post to the Aspiring Blacksmiths guild and tell us the following:
- what version of Docker you are using and what OS you are running it on
- any deviations you needed to make from the standard instructions
- any other information the instructions on this page asked you to record
- link(s) to your uploaded file(s)
- what problem you're experiencing
A key step to troubleshooting is being able to recreate the problem. For someone else to be able to help troubleshoot, unless they are already familiar with the problem, they will usually need to be able to replicate the situation on another system. Thus, any information that could help someone else duplicate the scenario is valuable. You should also be able to duplicate the problem yourself. Sometimes starting from the beginning can solve the problem or help identify a possible cause of the problem.
Install Git[]
Create a GitHub account if you don't already have one.
Install git on your machine (installation instructions available here).
Git Settings for Line Endings[]
This section is only relevant if you are using Docker on a Windows PC.
*nix operating systems (Linux and Mac OS X) handle line endings differently than Windows. *nix systems use the line feed (LF) character \n, while Windows uses a combination of a carriage return and line feed, \r\n (CRLF). Since Habitica developers use a variety of operating systems, to allow for maximum compatibility, Git on Windows must be set up to ensure that only LF line endings are committed to the repo.
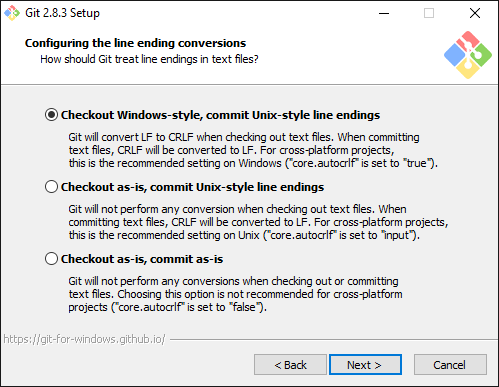
Configuring the line ending conversions
How you set this up depends on whether you will be doing all your code editing directly in Windows or in the Docker container. The appropriate setting can be chosen when installing Git (see the screenshot but read on before you chose an option) or afterwards using a simple command-line tool.
If you will be doing all your code editing in the Docker container, then when presented with the "Configuring the line ending conversions" window, select "Checkout as-is, commit Unix-style line endings". Alternatively, configure that setting from the command line by runninggit config --global core.autocrlf input
If you will be doing your code editing directly on your Windows host machine (i.e., you are using the Docker container to just run the Habitica server and tests), then select "Checkout Windows-style, commit Unix-style line endings", or configure it by runninggit config --global core.autocrlf true
If you chose one setting now and later decide to change how you do your development work, you can use the appropriate git config --global core.autocrlf ... command to change the setting.
For further information on line endings and whitespace in Git, see the "Formatting and Whitespace" section in the Pro Git book.
If you don't want to set the core.autocrlf setting globally, see Dealing with line endings > Per-repository settings to learn how to set it for individual repositories. This will only be relevant to you if you are already using Git for other projects or will be using it for others in future.
Note:
After finishing the above steps, it is important that from this point onwards you are logged in to your computer using the same user account that you will use when you will be developing code for Habitica. Do not log in as an administrator or root user. When elevated permissions are needed, this page will tell you to use them. Using elevated permissions at other times will cause problems.
Close any command windows or terminal windows that you have open from previous steps. When you need a command/terminal window again, open a new one so that your shell environment is aware of the software you have installed so far.
Fork and Clone Habitica[]
Acquire a copy of Habitica's codebase. There are multiple methods of doing this; the following is the simplest method, and is based on GitHub's Fork A Repo article.
- Fork Habitica's repository by going to https://github.com/HabitRPG/habitica and clicking on the "Fork" button. This creates a copy of Habitica's repository in your own GitHub account.
- If you had previously forked the repository, make sure your fork is up to date.
- On your machine, open a command prompt or terminal window. Change to the directory that you want Habitica's codebase to be copied under.
- Clone your copy of Habitica's repository with the command below (replace "YourUsername" with your GitHub username). This will copy Habitica's code onto your machine, placing the repository into a new "habitica" directory under your current directory.
git clone https://github.com/YourUsername/habitica.git - Change into the "habitica" directory that was created by the above step:
cd habitica
Remain in that directory for all future steps on this page, unless advised otherwise. - Configure Git to sync your fork with Habitica's repository.
git remote add upstream https://github.com/HabitRPG/habitica.git - Verify that everything is set up properly by typing
git remote -vwhich should produce output the same as the following but with your GitHub username in place:
  origin   https://github.com/YourUsername/habitica.git (fetch)
  origin   https://github.com/YourUsername/habitica.git (push)
  upstream https://github.com/HabitRPG/habitica.git (fetch)
  upstream https://github.com/HabitRPG/habitica.git (push)
Remain in the Correct Branch and Directory[]
After you have cloned Habitica's repository, you will be in the develop branch by default. This is the correct branch to be in when installing Habitica locally. You do not need to change to any other branches but if you do for any reason, you must switch back to the develop branch with git checkout develop before proceeding further with the installation. You can check which branch you are on with git branch (the branch with a star next to it is the branch you are currently on).
After you have followed all the steps above, you will be in Habitica's top-level directory. You must remain in that directory for all future steps on this page, unless advised otherwise. All commands below are written on the assumption that you are in that directory. If you change out of that directory for any reason, change back into it before continuing with the instructions on this page. If you want to check whether you are in the correct directory, look for a file called config.json.example - if you see that in your current directory, then you are in the right one.
Initial Habitica Configuration[]
Create your own copy of the config.json configuration file by copying (not renaming) the example file:cp config.json.example config.json
If desired, edit config.json:
- Normally you do not need to do this, but if you are aware of any reason to, you can do it now. You can also edit it at any later time if needed.
- One possible reason for editing config.json is to change the port that Habitica's Express server uses. By default, it uses port 3000 and there's no reason to change that unless you know that you are running other software on your machine that uses the same port. If you are, find the
BASE_URLandPORTlines inconfig.jsonand change the port to a suitable number. Use the same number for both. - There is no reason to change the value for ADMIN_EMAIL. It is deprecated and may be removed in the future.
- Do not edit
config.json.example.
Install MongoDB[]
As of July 15, 2020, it is not necessary to manually install MongoDB. A MongoDB instance specifically for Habitica will be installed automatically as you follow the steps below. It is also not necessary to manually start Habitica's MongoDB server using MongoDB's standard server start command.
(Note that if you are running a MongoDB server for projects other than Habitica, it will conflict with Habitica's own MongoDB instance and so it will need to be stopped while your Habitica local install is running. More details about this are given below at the point where it will be necessary to stop it.)
Install Docker[]
- Follow Docker's official instructions for installing docker and docker-compose.
- Verify your installation by clicking the Docker Quickstart Terminal icon on your Desktop (Windows) or Launchpad (Mac OS X).
- In the Docker Quickstart Terminal, cd to Habitica's top-level directory (the one that contains the
config.json.examplefile). Remain in that directory for all future steps on this page, unless advised otherwise.
Use docker-compose to Build and Start Docker Containers[]
| Note this article is still under construction
It may not function as expected. Check the discussion for info about its current state. |
On July 15, 2020, the process for running Habitica's MongoDB instance changed. The instructions below might no longer be correct. Please update them if you are aware of any way to improve them.
Run this command:docker-compose -f docker-compose.dev.yml up -d
That command will use Habitica's docker-compose.dev.yml file to build Docker containers to run the various parts of a Habitica install: the server, the website client, and a MongoDB database server. All software needed for those containers will be installed automatically during the build process. If you notice errors, read on to the "Review the Server Output" section below.
After the build is complete, if you wish to see the technical details of the three containers, you can run this command:docker ps
At this point, the version of Habitica running in the containers is the version that exists in your local clone of your fork of the repository. You can use git installed on your computer to create new branches in your local clone (i.e., do not use git in the container to create branches). You can used any text editor or IDE installed on your computer to edit Habitica's code (i.e., you do not have to use an editor in the container). After you have made changes, you'll need to update the Docker containers as described in the "Restarting the Local Web Server on Docker" section in Using Your Local Install to Modify Habitica's Website and API.
If you want to stop the containers, run:docker-compose stop
(NB: When you are ready to run Habitica's automatic test suite as described in Using Your Local Install to Modify Habitica's Website and API, that page will show you how to create another Docker container for running the tests.)
Check the Versions of Node and NPM[]
| Note this article is still under construction
It may not function as expected. Check the discussion for info about its current state. |
The information in this section has been written by someone not familiar with Docker. If you can improve this section, or if you can improve Habitica's Docker installation process in general, please do so! [edited on 19/09/23 by @diyoyo to take into account docker commands. First edit ever on the Habitica wiki, don't hesitate to give feedback if I messed up something]
The process above should result in the correct versions of node and npm being installed, which are exactly node 14 and npm 6. However its possible you won't have those versions and if not, you must install them yourself.
To check the versions, run:
docker compose exec client node --version
docker compose exec client npm --version
docker compose exec server node --version
docker compose exec server npm --version
If the versions aren't correct, follow the instructions in the "Install Node and NPM" section of Setting up Habitica Locally on Linux. Important: You must install exactly node 14 and npm 6. You will experience errors if you use any other versions, including later versions. If you need to use different versions on your development machine for work not related to Habitica, you can use nvm to manage the versions.
Review the Server Output[]
To view the output from the Habitica server, run docker-compose logs server
To view the output from building the website client, run docker-compose logs client
To view the output from starting mongo-db, run docker compose logs mongo
To view all outputs at once, just run docker compose logs
The output from the npm run mongo:dev command should look something like the example below. You may see slight differences (e.g., different version numbers).
> habitica@4.148.1 mongo:dev /home/alys/code/habitica

> run-rs -v 4.2.8 -l ubuntu1804 --keep --dbpath mongodb-data --number 1 --quiet


Skipping purge

Running '/home/alys/code/habitica/node_modules/run-rs/4.2.8/mongod' [ 27017 ]

Restarting replica set...

Started replica set on "mongodb://localhost:27017?replicaSet=rs"
Using docker, you can find useful information running docker compose logs mongo and looking for the following lines:
habitica-mongo-1 > I NETWORK  [initandlisten] listening via socket bound to 0.0.0.0
habitica-mongo-1 > I STORAGE  [LogicalSessionCacheRefresh] createCollection: config.system.sessions with generated UUID: f0ec449e-3456-4581-9ccf-c81a4a66c002
habitica-mongo-1 > I NETWORK  [initandlisten] listening via socket bound to /tmp/mongodb-27017.sock
habitica-mongo-1 > I NETWORK  [initandlisten] waiting for connections on port 27017
The output from starting the server should look something like the example below. You are likely to see slight differences in your system (e.g., different dates, times, and version numbers). The text in italics describes the type of information you might see and is not verbatim.
> habitica@4.116.8 start /home/username/habitica

> gulp nodemon


[18:39:02] Using gulpfile ~/habitica/gulpfile.js

[18:39:02] Starting 'nodemon'...

[18:39:02] Finished 'nodemon' after 25 ms

[18:39:02] [nodemon] 1.19.4

[18:39:02] [nodemon] to restart at any time, enter `rs`

[18:39:02] [nodemon] watching dir(s): [directory path(s) here]

[18:39:02] [nodemon] watching extensions: js,mjs,json

[18:39:02] [nodemon] starting `node ./website/server/index.js`

(node:3348) [ "DeprecationWarnings" might be here and/or below; they do not indicate an error ]

2019-10-20T08:39:08.767Z - info: Express server listening on port 3000

2019-10-20T08:39:08.960Z - info: Connected with Mongoose.
The output from building the website client appears in two stages, first some initial text while the client is being built (which might then be cleared from the screen) and then output that shows the client is ready.
The first stage should look something like the example below, with the final line changing rapidly. The text in italics describes the type of information you might see and is not verbatim.
> habitica@4.116.8 client:dev /home/username/habitica

> cd website/client && npm run serve


> habitica-client@1.0.0 serve /home/username/habitica/website/client

> vue-cli-service serve


INFO  Starting development server...

42% building 2584/2635 modules 51 active ... [file paths here]
The second stage should look something like the example below. The text in italics is not verbatim.
DONE  Compiled successfully in 12652ms       6:56:45 PM


App running at:

- Local:   http://localhost:8080/

- Network: http://your.IP.address:8080/


Note that the development build is not optimized.

To create a production build, run npm run build. [This is just informational and not an instruction for you to follow.]
If you see any output significantly different than those examples, in particular errors or notable warning messages, before going any further, resolve them yourself or report them using the guidelines in the "Prepare for Troubleshooting" section at the top of this page. Here are some examples of errors with suggested fixes:
ECONNREFUSEDand/orProxy error: Could not proxy request /api/v..... from localhost:8080 to http://localhost:3000- Check that your local database server is running using the instructions linked to from the Install MongoDB section above.
npm ERR! code ELIFECYCLE- If you are using Linux or Docker, this error is likely to be because nodemon requires more file watchers than inotify provides. Increase the number of file watchers. On Ubuntu and similar Linux distributions, you can do that using this command:
echo fs.inotify.max_user_watches=524288 | sudo tee /etc/sysctl.d/50-max-user-watches.conf && sudo sysctl --system
For other distributions, refer to your distribution's documentation. An example of this error is shown in this issue. - extra advice for Docker
- If the above tips don't help or if you see errors not listed there, try building your local Habitica image from scratch. Sometimes old code gets cached in the Habitica Docker image and this can cause problems when trying to use new code. Running the following command should build a fresh Docker image:
docker-compose -f docker-compose.yml -f docker-compose.dev.yml up -d --force-recreate --build
If the outputs from npm run mongo:dev and npm start and npm run client:dev look good, proceed to the next section to test the website. If you're not completely sure if they are good or not, proceed anyway but if the website fails it's likely that you'll need to resolve problems shown in the outputs.
Test the Website in your Browser[]
Open a browser to http://localhost:8080 to test the application. The website should look the same as https://habitica.com and work identically except that on the Tasks page in the bottom left-hand corner there will be a "Debug" menu (ignore it for now; it's described in the documentation linked at the end of this page but you don't need to use it yet).
If you get to the website's front page but it doesn't finish loading or if you get to the login screen but the login button does nothing, clear local storage for the "localhost" domain. You can do that by clicking the red "Clear Data" button at http://localhost:8080/static/clear-browser-data or by using your browser's JavaScript console (google for information about how to clear local storage in your preferred browser). Then reload the front page.
Create one or more accounts for your testing. The database used by your local install is hosted on your machine; it is not the same database that is used by Habitica itself and so your normal Habitica account will not be available to you.
Next Steps: Using Your Local Install[]
Now that you have a working local install of the Habitica website, please read Using Your Local Install to Modify Habitica's Website and API to learn how to contribute code.
It is also important that you read Guidance for Blacksmiths, which has information about the technologies used, how the Habitica code is structured, ideas for how you can help, and other information.
Note for Docker
Now that your containers are up and running, it is a good practice to make a first "backup" commit of this first installation, so you can go back to it faster should you need a full reset:
docker commit habitica-server-1 ${USER_ID}/habitica-server:dev-v${DATE}
docker commit habitica-client-1 ${USER_ID}/habitica-client:dev-v${DATE}
docker commit habitica-mongo-1 ${USER_ID}/habitica-mongo:dev-v${DATE}
See https://docs.docker.com/engine/reference/commandline/commit/ for more options.